Why I switched from the chimp: Mailchimp vs ConvertKit (Kit)
When I got started with my service-based business, I wasn’t super focused on growing my list (big regret on my part!) and my newsletter requirements were pretty simple – I just needed one simple signup form with one opt-in offering. But as I started offering more products and courses, I knew I needed to focus on growing my email list – and I needed a simple solution that would be easy for me to use (and to grow my business).
Over the years I’ve used a wide variety of email newsletter services for myself and my clients- everything from Constant Contact, to Campaign Monitor, to Flodesk, Aweber and Active Campaign – so I’ve seen the wide range of what’s out there. There are pros and cons to many email marketing tools – and it can feel like a big hassle to move once you’ve got things set-up and working.
But after using Kit* since 2016, I can tell you it is the #1 tool in my tech stack. It’s easy to use, allows me to quickly set-up waitlists for future offerings and simply tag and segment clients and prospects to I can send smart, targeted emails to people interested in my offers.
*note: ConvertKit changed its name to Kit in October 2024.
*Please note that I am an affiliate for some of the resources listed below. As an affiliate, I may earn a referral fee if you purchase these products based on my recommendations. I only recommend those services that I actually use in my own business.
Why I switched from Mailchimp to Kit
When I was using Mailchimp, I had to do a lot of cumbersome workarounds to make it meet my new needs. For example, when I started selling my first product, I wanted to add buyers to a special “buyers” email list so I could send them updates about the product. To do this, I had to use a 3rd party tool (zapier.com) that would connect buyers to my list when they purchased. I created various other “zaps” doing everything from adding people to special MailChimp groups to sending a sample .pdf from one of my ebooks. And I had over 10 separate email lists to keep track of special offers and groups of people that I wanted to keep separate. The whole thing felt cumbersome and tricky to use. I knew there had to be an easier way.
I felt like I had outgrown Mailchimp, but I didn’t really want to move to Keap (formerly known as Infusionsoft) or Ontraport. I had worked behind the scenes with larger clients that use both of these services to manage 100k+ sized lists and honestly, I didn’t want to have to spend the time reading the hours of documentation to get set-up (nor did I want to have to pay a “specialist” thousands of dollars to do it for me). As a designer, the interfaces of both services are not that intuitive. Plus I couldn’t justify the cost of either service to meet my specific needs. And I know that the harder something is it use, the less likely I’ll be to use it (and I know the more you email your audience, the more you’ll make!)
In my work, I’ve also used services like Flodesk and got frustrated with design aspects and creating easy signup forms. And tools like Active Campaign felt expensive (and pretty cumbersome) for the size of my list and what I wanted to do easily (email my list, track my buyers and tag people who were interested in different offers).
I’ve been hearing about Kit* for a while but I worried it would be too overwhelming to switch services, so I kept putting it off.
When I finally made the switch, I could tell that this was a product created by people who actually understand what their customers needed. And it was so much easier to use from the start than Mailchimp (especially after Mailchimp made some major interface changes).
Kit vs MailChimp Pricing
One of the biggest draws to Mailchimp is that for many years they were one of the few services that offered a free plan. When you’re just getting your business started every dollar counts. Kit recently added a free plan (with limited features) for up to 10000 subscribers – making it that much easier to get started. I recommend starting with the Creator Plan (around $33 a month for under 1000 subscribers) as it has a few more great features like unlimited sequences and automations.
One thing I’ll say about pricing – if you’re trying to get under a certain number of subscribers so you don’t pay more, make sure to do a list clean out – this means removing subscribers who are inactive or haven’t engaged with your emails (I use the metric of 3-6 months if you’re emailing on a regular basis – say 2-4x a month or more). Often you’ll be able to remove 25-50% of your list – this “dead weight” is just costing you monthly. Once you clean out your list, you’ll often find your engagement rates go way up!
In Kit you only have one list. Instead of multiple lists of subscribers, Kit uses “tags” to identify what your subscriber is interested (or not interested in). Tags are similar to MailChimp groups, but a heck of a lot easier to setup and use. Since you only have one list, subscribers are only counted once, but can be endlessly tagged. (In MailChimp subscriber count is based on lists – so the same person could be counted multiple times, which can add up when you’re paying a monthly fee). MailChimp has their own tagging system, but it’s not super intuitive or easy to use.
How to segment your email list with tags and segments
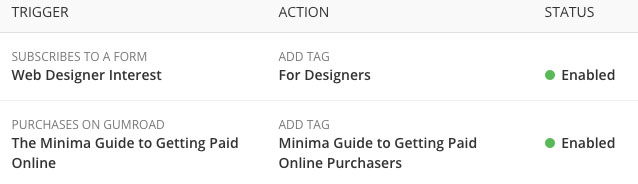
[Triggers that tag e-book buyers and subscribers interested in info specifically for web designers.]
One of the smartest things you can do from the start is segment your email list. When you segment your list, you’ll know what information subscribers are interested in – so you can market directly to that audience without “burning” your list (meaning, sending info that doesn’t relate to that other audience so they unsubscribe). This is especially smart if you have several different audiences you want to talk to.
[Sample Kit subscriber screen showing tags.]
Say you want to give your audience a specific free download – and you want to send those subscribers a specific sales offer. Simply create an email sign-up form and attach your download to the form. Then you can add an “automation” (what Kit calls triggers & actions) to tag a subscriber with your specific tag when they opt-in to that form. Now you can see exactly what subscribers are interested in what (and no more cumbersome workarounds if someone is already subscribed to your list). Then you can send those tagged subscribers a send a follow-up email or sequence. I also love this tagging strategy to build waitlists for your upcoming products and courses.
You can further group tagged subscribers into a “segment.” Let’s say you run a course once per year. You could tag each student with the year that they took the course, then create a larger segment that includes all the students who have taken the course over the years.
I’ve found it much more complicated to tag and segment With Mailchimp – while you can manually add tags (or import a list to a tag), doing simple things like a link trigger (where you tag someone when they click a link in a newsletter) turns out to much trickier (meanwhile this feature is super simple and built into Kit).
Automated email welcome sequences made easy
An email welcome sequence is a series of emails sent to your new subscriber when they first opt-into your list. When your subscriber first signs up, they’re excited to learn more about how YOU can help THEM. This is a smart way to share your knowledge and sell your services automatically. Kit makes it easy to make different sequences – you can send them when a user takes a certain action – like buying a product, getting on a waitlist or signing up for a specific lead magnet.
How to add email signup forms and landing pages to your website
I’m techy. I can dig into code. But the ability to drop a bit of pre-made code on a site and have it just work and look decent? This makes my heart happy. It takes just a few seconds to create a new form or landing page – with pre-set styles that are modern and clean. Want to get fancy? You can copy their code and customize it with CSS. Oh, they’re mobile friendly too. No more endless media query fixes that can take forever to make it look right on mobile devices.
Say someone has signed up already – you don’t want to keep showing them the same form, right? Well Kit gives you the option to promote other things if that person has already signed up. So smart. And if you’re using the WordPress plugin, you can show unique opt-in forms after every blog posts – that alone is a game-changer!
Sure I could write a function to show a different form after every blog post, but that would be a pain. Kit has an awesome plugin that allows you to select a specific form to show at the end of blog posts. Want a different opt-in offer after every blog post? Go crazy, because now you can. And even better? Gorgeous new landing pages integrate with your WordPress site in a snap. Check out my tutorial on how you can create your own landing page in less than 5 minutes. Need to add email opt-ins to a Squarespace site? It’s still super easy to add unique opt-in forms all over your site (you’ll just need the Squarespace business plan so you can add a bit of code).
Know what’s working to get you new subscribers
Statistics was the one class I avoided in college, but now I’ve learned to love it. And Kit makes it so easy to see what’s converting … and what isn’t. It’s dead easy to setup new forms for new offers.
I can easily see what forms are working. Subscribers are tagged with where they signed up (even if they signed up multiple times) – which allows me to do further analysis of the customer journey based on where they opted in.
Email campaigns are easy to create.
I’m a designer – I always “felt” like I had to create a “designed” newsletter. And this would stop me from writing a lot. You can create “graphic” newsletters with Kit, but I find it really excels with clean, simple text based newsletters. And guess what – I don’t dread writing newsletters anymore.
You can even create your own email newsletter templates to match your branding. I’ve made my own slightly modified templates so I can promote offerings in the footer of my newsletter without having to re-type it in every newsletter.
I would be remiss if I didn’t talk about a few things I don’t love…
There’s no app – other services have apps for on the go reporting.
You might have to pay a bit for extra features – like more robust reporting and subscriber scoring.
If you need a totally separate list (say for another business) you might want to set-up a separate account or if you need more e-commerce related capabilities you might want to use a different system like Campaign Monitor or Klaviyo.
Wondering if you should switch?
If you’re running a yoga studio or fitness business…
You probably need to stick with your current service if you’re integrated into MindBody Online.
If you’ve got an e-commerce business selling physical products
You might want to look at using Klaviyo or Campaign Monitor.
If you need to integrate with courses you’ve already setup…
You might want to stick with what you’re currently using if you’re already heavily invested (especially if you’re already using Infusionsoft (Keap) or Ontraport). Or you can switch and use a 3rd party connection tool like zapier to connect Kit to your current platform.
If you’re a blogger, service provider or going to create courses and products in the future…
If you’re looking to create courses or products (especially using Gumroad or Kajabi) Kit might be a great option for you. It has native integration with those services, making it a snap to connect your products and courses and tag subscribers and send follow-up emails.
Integrating Kit with other tools and services
The Kit App Store is your shortcut to a smarter workflow. It’s a curated collection of free and paid apps that plug your favorite tools right into Kit — no more juggling other 3rd party tools or piecing together data. These apps feel like they’re built right in, so you can access richer subscriber insights, drop in polished creative assets, and use AI to speed things up—all without ever leaving Kit.
A few of my favorite apps that you can connect directly inside the App Store.
Canva – get access to your Canva gallery directly inside Kit. Your Canva designs sync automatically to the Kit Media Gallery – no more downloads/uploads. A great time saver!
Gumroad – add buyer info directly to your list. I used Gumroad for years to sell my ebook – it’s simple, easy to use and you don’t even need a website to sell your digital downloads.
WooCommerce – Using WooCommerce to sell your stuff? The Kit app connect your buyer info from your site to your Kit account. Plus gives your buyers an option to opt-into your main list at checkout.
Gravity Forms – my absolute favorite WordPress form plugin. I use the connection to add people to my list when they fill out my contact form (and they select the option to be added to my list).
…plus there’s a ton of other apps that can connect Kit to Shopify, Squarespace Commerce, Stripe and more!
Checklist of what you need to change before, during and after you switch your email newsletter service
A few notes on what to do if you do decided to switch email providers.
Make sure to export (and save) your current lists.
Make a note of ALL the places you have linked to your newsletter signup forms and update your links. Places like landing pages, blog posts, sidebars, contact forms – and don’t forget your social media accounts and profile bios!
Don’t delete your old account for a least a few weeks (people often open newsletters days later, so you want to make sure you get an accurate accounting). In fact, one thing I do is keep old accounts open and remove all the old subscribers – that way you keep access to your old data and content. Usually if you have no subscribers, you won’t have to pay anything.
*Please note: I’m a user and affiliate for Kit and may receive compensation if you sign-up using my link. I only recommend products I use for myself and my clients.
ABOUT THE AUTHOR
Michelle Martello of Minima Designs
Michelle Martello is a Kajabi and ConvertKit (Kit) expert, award-winning digital strategist, and founder of Minima Designs. She works with entrepreneurs and creators to launch, grow, and streamline their online businesses — from creating all kinds of digital products and programs to email marketing and automation. Michelle offers 1:1 strategy consults for anyone looking to simplify the tech and build a business that actually works (and lasts).
Is there a designer’s signup for special info? Thank you so much for this information, Michelle. Love that you’ll be training. Means more quality talent will be created!
What a great review, Michelle! I especially love your checklist at the end of what you need to know and do before a move. So happy to have you in the ConvertKit Family (and thanks for the shout out!)
Thanks Madeleine! I looked at AC, but I haven’t tested it, so I can’t give it an accurate comparison. I know it has similar capabilities – so depending on your needs it might be a better fit.
Hey Michelle! Great article! I’m seeing more and more people make this move to Mailchimp, and I love the fact that you said its great if you are moving away from a service-based model to products and courses.
Question for you – as a fellow Genesis user, how well does Convertkit play with the Genesis enews Extender? Or do you even use that plugin anymore?
Hi Chrissy,
I’ve never used the enews extender, so I couldn’t say one way or the other – honestly, I just copy + paste the script from ConvertKit and I’m good to go 😉 (you can tweak CSS etc. in their service)
I just watched the ConvertKit video and am SOLD! It looks amazing and gets rid of the problem I have with Mailchipm where a subscriber could be gettin multiple copies of emails…Thanks for the post!
Hey Alan,
That’s a great workaround for MC – thanks for sharing! Converting to the new system isn’t too bad – the hard part is remembering all the places you have linked to your signup list (especially outside of your website)!
Hi Ilzy – I have heard of it, but have not tried mailerlite. It is critical that whatever software I choose meets my specific needs (or those of my clients) – so if that software works for you, I’d recommend testing it out. It’s also important that it integrates with whatever 3rd party apps I might need to use (such as gumroad)- and that customer support is stellar (all true with ConvertKit). Good luck!
Great article Michelle. I went through the same pain with Mailchimp on a paid account and moving to Convertkit was a breeze. Also, its interface is more user friendly and easy to use for non-technical people.
While I am still trying to figure out why some of my forms are not showing right, Convertkit still wins hands down.
Thanks for sharing your experience! I’ve been considering a switch myself and your insights on the differences between Mailchimp and ConvertKit are super helpful. It’s great to hear about the user-friendly features of ConvertKit and how it can really cater to creators. I think I might take the plunge!
Great insights on the differences between Mailchimp and ConvertKit! I’ve been contemplating making the switch, and your detailed comparison really helped clarify my decision. I appreciate the personal touch you added with your experience—it’s nice to see how these tools can impact real users. Looking forward to trying ConvertKit!


 Michelle Martello is a Kajabi and ConvertKit (Kit) expert, award-winning digital strategist, and founder of Minima Designs. She works with entrepreneurs and creators to launch, grow, and streamline their online businesses — from creating all kinds of digital products and programs to email marketing and automation. Michelle offers 1:1 strategy consults for anyone looking to simplify the tech and build a business that actually works (and lasts).
Is there a designer’s signup for special info? Thank you so much for this information, Michelle. Love that you’ll be training. Means more quality talent will be created!
Found it!
Thanks Sondra!
What a great review, Michelle! I especially love your checklist at the end of what you need to know and do before a move. So happy to have you in the ConvertKit Family (and thanks for the shout out!)
Thanks Val! If I love something, I shout about it (and share 😉 I want to see you guys succeed!
Thanks so much, Michelle! Great review — short & sweet yet immensely helpful 🙂 Do you have any experience with Active Campaign?
Thanks Madeleine! I looked at AC, but I haven’t tested it, so I can’t give it an accurate comparison. I know it has similar capabilities – so depending on your needs it might be a better fit.
Thank you 🙂
Hey Michelle! Great article! I’m seeing more and more people make this move to Mailchimp, and I love the fact that you said its great if you are moving away from a service-based model to products and courses.
Question for you – as a fellow Genesis user, how well does Convertkit play with the Genesis enews Extender? Or do you even use that plugin anymore?
Thanks for the great insight again!
Hi Chrissy,
I’ve never used the enews extender, so I couldn’t say one way or the other – honestly, I just copy + paste the script from ConvertKit and I’m good to go 😉 (you can tweak CSS etc. in their service)
I just watched the ConvertKit video and am SOLD! It looks amazing and gets rid of the problem I have with Mailchipm where a subscriber could be gettin multiple copies of emails…Thanks for the post!
Allyson – that was my biggest issue for sure! I’m in love with tagging – it’s making my life so much easier now.
Hey Alan,
That’s a great workaround for MC – thanks for sharing! Converting to the new system isn’t too bad – the hard part is remembering all the places you have linked to your signup list (especially outside of your website)!
Hi Ilzy – I have heard of it, but have not tried mailerlite. It is critical that whatever software I choose meets my specific needs (or those of my clients) – so if that software works for you, I’d recommend testing it out. It’s also important that it integrates with whatever 3rd party apps I might need to use (such as gumroad)- and that customer support is stellar (all true with ConvertKit). Good luck!
Great article Michelle. I went through the same pain with Mailchimp on a paid account and moving to Convertkit was a breeze. Also, its interface is more user friendly and easy to use for non-technical people.
While I am still trying to figure out why some of my forms are not showing right, Convertkit still wins hands down.
Thanks so much Preeti!
Thanks for sharing your experience! I’ve been considering a switch myself and your insights on the differences between Mailchimp and ConvertKit are super helpful. It’s great to hear about the user-friendly features of ConvertKit and how it can really cater to creators. I think I might take the plunge!
glad it was helpful! I think it’s the easiest solution for creators – and they keep adding more and more features.
Great insights on the differences between Mailchimp and ConvertKit! I’ve been contemplating making the switch, and your detailed comparison really helped clarify my decision. I appreciate the personal touch you added with your experience—it’s nice to see how these tools can impact real users. Looking forward to trying ConvertKit!