I often work with a lot of clients who need to show schedules, rates or options on their website. For ease of readability and maintenance, I like to place this data into a table.
My favorite way to do this in WordPress is to use a great free plugin named TablePress.
The flexibility of this plugin is incredible – you can dynamically add rows and columns, reorder data and even sort data. You can even easily add logos and links.
I use this technique a lot to show class schedules, to show rates and fees and to display any sort of data I want to show in a clean format.
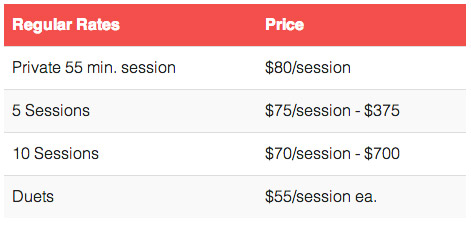
See the finished product used on Justin’s site below:

How to Create a Table Using Tablepress
- Install and activate the plugin from the plugin directory
- Click TablePress on the left-hand menu of WordPress
- Click “Add New Table“
- Add a table name (name it something that makes sense to you)
- Choose how many rows and columns you want (don’t worry, you can change this later)
- Click Add Table
- Add your content in the table cells
- If you want a special header row, make sure to click the checkbox in front of “The first row of the table is the table header.”
- Click Save
- To insert the table into a page or blog post, edit a page or post. Then click the “table” button on the editor buttons.
Note: You can always go back into the table to edit it later. If you want to customize your table, you can use special CSS classes to modify elements like row or column color, cellpadding and border colors. This can be edited by going to TablePress > Plugin Options on the left-hand menu.
In Justin’s example, we made the table header row a red-orange color with white text to match his site color scheme by adding this CSS style:
th {

	background: #ef4f4f !important;

	color: #fff !important;

}
The beauty of using this plugin is that you can reuse tables all over your website instead of recreating content over and over. You can also duplicate a table — this is great if you have a monthly schedule that you want to recreate and make modifications without deleting the current month’s info.
 Michelle Martello is a Kajabi and ConvertKit (Kit) expert, award-winning digital strategist, and founder of Minima Designs. She works with entrepreneurs and creators to launch, grow, and streamline their online businesses — from creating all kinds of digital products and programs to email marketing and automation. Michelle offers 1:1 strategy consults for anyone looking to simplify the tech and build a business that actually works (and lasts).
Thanks Michelle! Super helpful.
You’re welcome Cynthia! Let me know if there’s anything else you’d like me to cover!